
How to Clean a Laptop Fan: 9 Essential Steps for Better Cooling and Performance
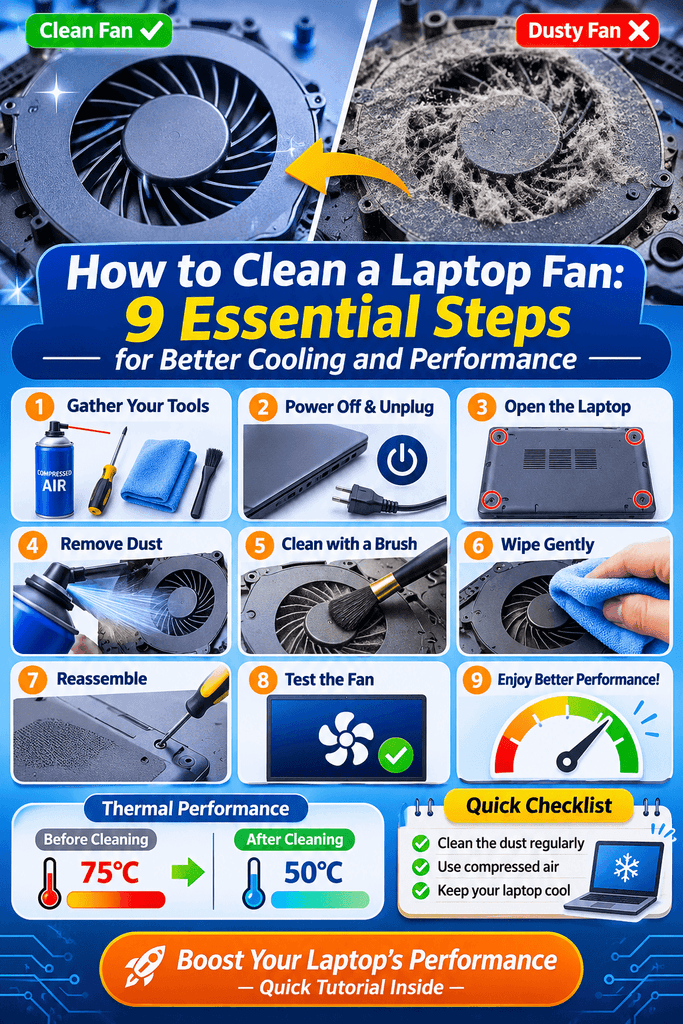
A laptop is designed to operate within a safe temperature range, even when running demanding applications. However, dust, dirt, and other airborne particles can gradually accumulate inside its cooling system. Over time, this buildup can restrict airflow, reduce cooling efficiency, and cause the computer to overheat. One of the most common reasons for these problems is a dirty cooling fan.
Learning how to clean laptop fan properly is an important part of maintaining a computer. Regular cleaning helps remove accumulated dust, improves airflow, reduces unnecessary fan noise, and supports stable system performance. It can also help prevent overheating-related problems that may affect internal components.
The cooling fan plays an essential role in regulating the temperature of a laptop. It draws cool air into the cooling system and helps remove hot air generated by the processor, graphics processing unit, and other internal components. When dust blocks the fan blades, air vents, or heatsink fins, the cooling system may struggle to remove heat effectively.
Fortunately, cleaning the cooling system does not always require professional assistance. With the correct tools, appropriate precautions, and a little patience, many users can safely remove dust from accessible cooling components.
This guide explains the cleaning process step by step, including the tools required, safety precautions, different cleaning methods, common mistakes, and maintenance tips. It also explains when professional servicing is a better option.
Read More: How to Clean Laptop Screen: Complete Guide to Safe Cleaning Methods, Tools, Steps and Maintenance
1. Understanding Why a Laptop Fan Needs Cleaning
Before learning the cleaning procedure, it is useful to understand why dust accumulation affects a computer’s cooling system.
A cooling fan is a mechanical component that circulates air through the laptop. During normal operation, it draws air through ventilation openings and pushes warm air away from heat-producing components.
However, the air entering the computer may contain dust, lint, hair, and other small particles. These particles can gradually collect around the fan blades, heatsink, and ventilation openings.
How Dust Affects Cooling Performance
Dust accumulation can create several problems:
- Restricted airflow: Dust blocks ventilation openings and reduces the amount of air circulating through the cooling system.
- Higher operating temperatures: Reduced airflow makes it more difficult to remove heat from internal components.
- Increased fan noise: The cooling system may operate at higher speeds to compensate for insufficient airflow.
- Reduced performance: The processor may automatically lower its operating speed to prevent overheating.
- Unexpected shutdowns: Excessive temperatures can cause a computer to shut down automatically as a protective measure.
When the cooling system becomes heavily contaminated, cleaning the laptop fan and surrounding components can help restore proper airflow.
Signs That the Cooling System Needs Cleaning
Several symptoms may indicate that dust has accumulated inside the computer.
1. Excessive fan noise
A fan that frequently produces loud airflow noise may be working harder than necessary to maintain a suitable temperature.
2. Overheating
If the computer becomes unusually hot during ordinary activities, restricted airflow may be one possible cause.
3. Slow performance
A processor that reaches high temperatures may reduce its clock speed through a process called thermal throttling. This can make applications run more slowly.
4. Frequent fan operation
If the cooling fan runs continuously, even when only basic applications are open, the cooling system may need inspection.
5. Hot air around the exhaust vents
Warm air coming from the exhaust vents is normal during operation. However, unusually high temperatures combined with poor airflow may indicate a cooling problem.
It is important to remember that these symptoms do not always indicate dust accumulation. Faulty fans, dried thermal paste, demanding background applications, and damaged cooling components can produce similar problems.
Read More: Best AI Tools for Academic Research Automation: 11 Essential Tools, Features, and Benefits
2. Tools Required to Clean a Laptop Fan
Preparing the correct tools before starting makes the cleaning process easier and reduces the risk of damaging delicate components.
You do not need an extensive collection of equipment. However, using appropriate tools is important because laptop components are relatively small and sensitive.
Essential Cleaning Tools
1. Precision screwdriver set
A precision screwdriver set is useful for removing the small screws that secure the bottom cover of a laptop. Different manufacturers use different screw types, so select the correct screwdriver for your model.
2. Compressed air
Compressed air can remove loose dust from fan blades, heatsink fins, and ventilation openings. Use short, controlled bursts rather than continuous airflow.
3. Soft anti-static brush
A soft electronics cleaning brush helps loosen dust that remains attached to the fan blades or surrounding surfaces.
4. Anti-static wrist strap
An anti-static wrist strap helps reduce the risk of electrostatic discharge, which can damage sensitive electronic components.
5. Microfiber cloth
A clean microfiber cloth is useful for wiping dust from the exterior of the laptop and its ventilation openings.
6. Small container
A small container or magnetic parts tray helps keep screws organized during disassembly.
Optional Tools
Some additional tools may make the process easier:
- Plastic opening tools for removing the bottom cover.
- A flashlight for inspecting narrow spaces.
- A pair of fine-tipped tweezers for removing loose debris.
- A replacement fan if the existing component is damaged.
- An appropriate thermal paste if the heatsink must be removed and its thermal interface needs replacement.
Avoid using ordinary household vacuum cleaners directly on exposed electronic components. They can generate static electricity and may damage sensitive parts.
Read More: AI SEO Automation Features: 9 Essential Benefits, Tools, and Strategies for Better Rankings
3. Important Safety Precautions Before Cleaning
Safety is essential when working with internal laptop components. An incorrect cleaning procedure can damage the motherboard, cooling fan, battery, or other hardware.
Before opening the computer, follow these precautions.
Shut Down the Laptop Completely
Save your work and shut down the operating system. Do not simply put the computer into sleep or hibernation mode.
Wait until all indicator lights and fans have stopped operating.
Disconnect the Power Supply
Unplug the charger and disconnect all external devices, including USB drives, external monitors, and other accessories.
This prevents accidental electrical connections during cleaning.
Disconnect the Internal Battery
If the laptop has a removable battery, remove it before opening the casing.
For laptops with internal batteries, follow the manufacturer’s service instructions to disconnect the battery after removing the bottom cover. If you are unfamiliar with this procedure, consider professional servicing.
Never work around exposed internal components while the battery remains connected unless the manufacturer’s service procedure specifically requires it.
Prevent Electrostatic Discharge
Electronic components can be damaged by electrostatic discharge (ESD), even when the discharge is too small for a person to notice.
To reduce this risk:
- Work on a clean, dry, non-carpeted surface.
- Use an anti-static wrist strap when possible.
- Handle circuit boards by their edges.
- Avoid touching exposed electrical contacts.
- Keep plastic bags and other static-generating materials away from internal components.
Allow the Laptop to Cool Down
If the computer has recently been used, allow it to cool before opening the casing.
Hot internal components can cause discomfort or burns, while a cool system is generally easier and safer to inspect.
Read More: AI Automation Consulting: 9 Essential Benefits, Services, Strategies, and Business Applications
4. How to Clean Laptop Fan Without Opening the Laptop
Cleaning through the external ventilation openings is one of the simplest approaches. It is suitable for removing loose dust when the internal components are not heavily contaminated.
However, this method cannot always remove dust trapped deep inside the cooling system.
Follow these steps:
Step 1: Turn Off the Computer
Completely shut down the laptop and disconnect the power adapter.
Place it on a flat, clean surface with enough space to access the ventilation openings.
Step 2: Locate the Air Vents
Identify the intake and exhaust vents.
Depending on the design, these openings may be located:
- Along the sides of the laptop.
- Near the rear hinge.
- On the bottom panel.
- Along the rear edge of the casing.
Check the manufacturer’s documentation if you cannot identify the ventilation openings.
Step 3: Position the Compressed Air Can
Hold the compressed air can upright and position its nozzle a suitable distance from the vent.
Follow the manufacturer’s instructions regarding the recommended distance and handling position.
Step 4: Apply Short Bursts of Air
Use short, controlled bursts of compressed air to loosen dust around the ventilation openings.
Avoid spraying continuously because excessive airflow can cause moisture or propellant to escape from the can.
Step 5: Clean the External Vents
Use a soft brush to remove loose dust around the outside of the ventilation openings.
Do not push the brush deeply into the casing.
Step 6: Inspect the Airflow
After cleaning, allow any disturbed dust to settle. Reconnect the power supply and start the computer.
Check whether the cooling system operates normally.
Important: External cleaning is not a substitute for internal cleaning when dust has accumulated around the fan blades or heatsink. Do not assume that blowing air into a vent has removed all internal dust.
5. How to Clean Laptop Fan by Opening the Back Cover
Opening the bottom cover provides better access to the cooling system. This method is generally more effective when dust has accumulated around the fan blades and heatsink.
However, not every laptop is designed for easy disassembly. Some models use hidden screws, fragile clips, adhesive components, or complicated internal layouts.
If your manufacturer does not recommend user disassembly, seek professional assistance.
Step 1: Prepare the Workspace
Place the shut-down computer on a clean, flat surface.
Organize the necessary tools and keep a small container nearby for storing screws.
Make sure the work area is well-lit so that you can clearly see the internal components.
Step 2: Remove the Bottom Cover
Use the appropriate precision screwdriver to remove the screws securing the bottom panel.
Some laptops have screws hidden beneath rubber feet or decorative covers. Check the service manual before attempting to remove these parts.
After removing the screws, use a plastic opening tool to release the cover clips carefully.
Avoid using excessive force. If the panel does not open easily, check for additional screws or hidden fastening points.
Step 3: Disconnect the Battery
Once the bottom cover is removed, locate the internal battery connector.
Follow the manufacturer’s service instructions to disconnect it safely.
Do not pull the connector by its wires. Use the recommended method for releasing the connector.
Step 4: Locate the Cooling Fan
Identify the cooling fan and its surrounding components.
The fan is usually connected to a heatsink through a heat pipe or another heat-transfer structure.
You may also notice dust around the following areas:
- Fan blades.
- Fan housing.
- Heatsink fins.
- Air intake openings.
- Exhaust channels.
Understanding the arrangement of these components helps you clean them without disturbing their connections.
Step 5: Inspect the Dust Accumulation
Before cleaning, examine the fan and heatsink carefully.
Look for visible dust, hair, lint, and other debris.
Pay particular attention to the narrow spaces between the heatsink fins. Dust can form a thick layer in these areas and restrict airflow.
Step 6: Hold the Fan Blades in Place
Before using compressed air, prevent the fan blades from spinning freely.
Use a non-metallic tool or a suitable method recommended by the manufacturer to hold the fan stationary.
Do not push hard against the blades or place pressure on the motor.
Allowing the fan to spin at excessive speeds under compressed air can damage its bearings or electrical components.
Step 7: Remove Loose Dust
Apply short bursts of compressed air toward the fan blades and surrounding areas.
Direct the airflow so that dust moves away from the internal components rather than deeper into the cooling assembly.
Work gradually around the fan housing.
Step 8: Brush Away Stubborn Dust
If some dust remains attached to the fan blades, use a soft anti-static brush.
Move the brush gently and avoid applying pressure to the blades or motor.
For difficult-to-reach areas, use a flashlight to inspect the remaining debris.
Step 9: Clean the Heatsink Fins
The heatsink contains several narrow metal fins that increase the surface area available for heat transfer to the surrounding air.
Dust trapped between these fins can significantly reduce cooling efficiency.
Use short bursts of compressed air and a soft brush to remove accumulated particles.
Make sure the dust is directed out of the cooling channel.
Step 10: Inspect the Exhaust Opening
Check the exhaust opening for any remaining dust.
A blocked exhaust channel can prevent hot air from leaving the computer effectively.
Remove visible debris carefully without bending the delicate metal fins.
Step 11: Check the Fan Condition
After cleaning, inspect the fan for:
- Broken or damaged blades.
- Unusual movement.
- Loose mounting screws.
- Visible corrosion.
- Signs of cable damage.
A fan that is physically damaged or produces grinding noises may need replacement rather than cleaning.
Step 12: Reassemble the Laptop
Once the cleaning process is complete, check that no loose screws, brushes, or cleaning materials remain inside the computer.
Reconnect the battery according to the manufacturer’s instructions.
Position the bottom cover correctly and secure it with the original screws.
Do not force the cover into place.
Read More: Gridone AI Automation: A Complete Guide to Features, Benefits, Use Cases, and Future Potential
6. How to Clean Laptop Fan With Different Cleaning Methods
Different cleaning tools are suitable for different situations. Choosing the right method helps remove dust without unnecessarily exposing internal components to damage.
Using Compressed Air
Compressed air is one of the most commonly used tools for cleaning computer cooling systems.
It can remove loose dust from fan blades, heatsink fins, and ventilation openings.
Advantages:
- Removes dust from narrow spaces.
- Does not require direct contact with delicate components.
- Makes routine cleaning relatively quick.
- Can reach areas that are difficult to access with a brush.
Limitations:
- May not remove sticky or compacted dust.
- Can push debris deeper into the cooling assembly if used incorrectly.
- Improper handling can release liquid propellant.
Always use compressed air according to the product instructions.
Using an Anti-Static Brush
An anti-static brush is useful for removing dust that remains attached to internal surfaces.
Use gentle movements and avoid touching electrical contacts unnecessarily.
Advantages:
- Helps loosen stubborn dust.
- Provides greater control over the cleaning process.
- Useful for cleaning fan blades and surrounding surfaces.
Limitations:
- Requires careful handling.
- Cannot easily reach every narrow opening.
- May spread dust if used without appropriate airflow or collection.
Using an Electric Air Duster
An electric air duster produces a stream of air using an electric motor.
It can be useful for people who regularly clean computers and other electronic equipment.
Advantages:
- Reusable.
- Does not require disposable compressed-air cans.
- Can provide consistent airflow.
Limitations:
- Some models produce excessive airflow.
- Improper use can overspin fan blades.
- The nozzle may be too large for narrow openings.
Choose an electronics-safe model with controlled airflow.
Using a Microfiber Cloth
A microfiber cloth is suitable for cleaning the exterior of the computer.
It can remove dust and fingerprints from the casing without scratching most common laptop surfaces when used correctly.
However, it should not be pushed into the fan housing or used to clean exposed circuit boards.
Read More: AI Automation Platform: 9 Essential Benefits, Features, Types & Applications
7. Common Mistakes to Avoid When Cleaning a Laptop Fan
Although cleaning is a relatively straightforward maintenance activity, several mistakes can damage the cooling system.
Avoid the following practices.
1. Using a Vacuum Cleaner Directly on Internal Components
Household vacuum cleaners can generate static electricity and may damage sensitive electronic parts.
They can also apply excessive suction to small components.
Use appropriate electronics-cleaning equipment instead.
2. Allowing the Fan to Spin Freely
Compressed air can make the fan rotate at speeds beyond its normal operating range.
This may damage the bearings or motor.
Always hold the blades stationary using an appropriate non-metallic method before directing compressed air at them.
3. Spraying Liquid Cleaners Inside the Laptop
Water, household cleaning sprays, and ordinary liquid detergents should never be sprayed into the cooling system.
Moisture can cause corrosion, short circuits, and permanent component damage.
Use dry cleaning methods for routine dust removal.
4. Using Excessive Force
Fan blades, connectors, and heatsink fins can be delicate.
Applying excessive pressure may bend the fins, break the blades, or disconnect small cables.
Use gentle movements throughout the process.
5. Opening the Laptop Without Checking the Manual
Different laptop models have different internal layouts and disassembly requirements.
Some manufacturers use special fasteners or fragile clips.
Always consult the service manual before removing the bottom cover.
6. Cleaning While the Laptop Is Connected to Power
Working on exposed electronic components while the charger or battery is connected increases the risk of electrical damage.
Always shut down the computer, unplug the charger, and disconnect the internal battery according to the service instructions.
7. Using a Hair Dryer
A household hair dryer is not an appropriate tool for internal computer cleaning.
It may produce excessive heat, generate static electricity, and push dust into inaccessible areas.
Use an electronics-safe air duster instead.
8. Removing the Heatsink Unnecessarily
The heatsink is often connected to the processor and graphics processor through thermal paste or thermal pads.
Removing it may disturb these thermal interfaces.
If the heatsink must be removed, the thermal interface material may need to be replaced according to the manufacturer’s instructions.
9. Reassembling Without Checking Connections
Loose battery connectors, fan cables, or screws can cause operational problems.
Before closing the computer, check that all connections are secure and that no cleaning materials remain inside.
8. How Often Should You Clean a Laptop Fan?
The ideal cleaning frequency depends on the environment, computer usage, and cooling system design.
A laptop used in a clean office may accumulate dust more slowly than one used in a dusty workshop or a room with pets.
The following schedule provides a general guideline.
| Usage environment | Suggested inspection frequency |
| Clean office or home | Every 6–12 months |
| Regular everyday use | Every 6 months |
| Dusty environment | Every 2–3 months |
| Gaming or intensive workloads | Every 3–6 months |
| Environment with pets | Every 2–4 months |
These intervals are general recommendations rather than fixed requirements. Follow the manufacturer’s maintenance guidance where available.
Factors That Affect Cleaning Frequency
1. Environmental dust
Dusty rooms, construction areas, and poorly ventilated spaces can increase the rate of dust accumulation.
2. Pet hair
Pet hair can enter ventilation openings and become trapped around the cooling fan.
3. Intensive computer usage
Gaming, video editing, 3D rendering, and other demanding workloads generate substantial heat. The cooling system may operate more frequently under these conditions.
4. Laptop placement
Using a computer on a bed, blanket, sofa, or soft surface can obstruct ventilation openings and increase dust accumulation.
5. Room ventilation
Poor ventilation can contribute to higher ambient temperatures and may make cooling more difficult.
Read More: AI Automation News: 11 Major Trends, Breakthroughs & Business Impacts in 2026
9. How to Check Whether the Laptop Fan Is Working Properly After Cleaning
After completing the cleaning procedure, check whether the cooling system operates normally.
A clean fan should be able to circulate air without unusual mechanical noises or unnecessary obstruction.
Step 1: Reconnect the Power Supply
After reassembling the computer and confirming that all internal connections are secure, reconnect the charger.
Start the operating system normally.
Step 2: Listen for Unusual Noise
Pay attention to the cooling system during startup and ordinary use.
A properly functioning fan should not produce grinding, scraping, or clicking noises.
Some laptops have quiet or fanless operating modes, so the fan may not operate continuously.
Step 3: Monitor Internal Temperatures
Temperature-monitoring applications can help you observe CPU and GPU temperatures.
Compare the readings under similar workloads before and after cleaning, if previous measurements are available.
Temperature readings vary depending on the processor, laptop design, room temperature, and workload.
There is no single temperature that is suitable for every computer.
Step 4: Check Airflow
Observe whether air moves through the exhaust vents when the fan operates.
Warm exhaust air is generally normal because the cooling system is designed to remove heat from internal components.
However, very weak airflow combined with high temperatures may indicate a remaining blockage or another cooling problem.
Step 5: Test Under Normal Workloads
Open commonly used applications and observe the computer’s behaviour.
Check whether the fan operates smoothly and whether the system maintains stable performance.
Avoid immediately running an extremely demanding application simply to test the cooling system.
Step 6: Observe Performance
A successful cleaning may reduce unnecessary fan noise and improve temperature management.
If the computer continues to overheat, further diagnosis may be necessary.
Possible causes include:
- Dried or improperly applied thermal paste.
- Damaged fan bearings.
- A faulty fan motor.
- Blocked internal cooling channels.
- Poor heatsink contact.
- High background CPU or GPU usage.
Cleaning addresses dust-related problems, but it cannot repair damaged hardware.
10. When Should You Replace a Laptop Fan Instead of Cleaning It?
Cleaning is not always enough to restore proper cooling performance.
A fan is a mechanical component that can eventually wear out due to continuous operation, bearing damage, or physical deterioration.
In such situations, replacement may be necessary.
Signs That a Fan Needs Replacement
1. Grinding or clicking sounds
Unusual mechanical noises may indicate damaged bearings or internal obstructions that cannot be corrected through ordinary cleaning.
2. Fan does not rotate
If the fan does not operate when cooling is required, the motor, cable, connector, or control circuit may be faulty.
3. Broken blades
Damaged blades can create vibration, noise, and reduced airflow.
4. Persistent overheating
If the computer continues to overheat despite proper cleaning and unobstructed ventilation, the cooling fan or another component may be defective.
5. Excessive vibration
A damaged or unbalanced fan may vibrate during operation.
Choosing a Replacement Fan
If replacement is necessary, select a compatible component.
Check the following details:
- Exact laptop model number.
- Fan part number.
- Connector type.
- Voltage rating.
- Physical dimensions.
- Mounting arrangement.
- Airflow direction.
Using an incompatible replacement can cause installation problems or insufficient cooling.
For complex models, professional installation is recommended.
11. Additional Tips to Keep Your Laptop Cooling System Clean
Regular maintenance can reduce dust accumulation and help the cooling system operate efficiently.
Besides cleaning, several everyday habits can improve airflow and reduce unnecessary heat.
Use the Laptop on a Hard Surface
Place the computer on a desk or another firm, flat surface.
Avoid using it on blankets, pillows, beds, and carpets because these surfaces can block bottom ventilation openings.
Keep the Ventilation Openings Unobstructed
Maintain enough space around the sides and rear of the computer for proper air circulation.
Do not place books, clothing, or other objects directly against the exhaust vents.
Maintain a Clean Working Environment
Clean the desk and surrounding area regularly.
Reducing airborne dust can help slow the accumulation of particles inside the cooling system.
Avoid Excessive Heat Exposure
Do not leave the computer in direct sunlight, inside a hot vehicle, or near heat-producing appliances.
High ambient temperatures can make it more difficult for the cooling system to maintain safe operating temperatures.
Monitor Background Applications
Some applications use significant processor or graphics resources even when they are not actively being used.
Close unnecessary programs and check the task manager for processes that consume excessive resources.
Reducing unnecessary workloads can decrease heat generation and fan activity.
Consider a Laptop Cooling Pad
A cooling pad is an external accessory that uses additional fans to circulate air around the computer.
It may help certain laptop designs maintain lower operating temperatures, particularly during demanding workloads.
However, its effectiveness depends on the laptop’s ventilation arrangement and the cooling pad design.
A cooling pad cannot replace internal cleaning or repair a faulty cooling system.
Follow Manufacturer Maintenance Recommendations
Laptop manufacturers may provide model-specific instructions for cleaning, disassembly, and component replacement.
Following these instructions reduces the risk of damaging clips, connectors, batteries, and other internal components.
12. Professional Cleaning vs. DIY Cleaning
There are two main approaches to maintaining the internal cooling system: cleaning it yourself or hiring a professional technician.
Both approaches have advantages and limitations.
| Factor | DIY cleaning | Professional cleaning |
| Cost | Usually lower | Usually higher |
| Equipment | Basic cleaning tools | Professional repair equipment |
| Convenience | Requires personal effort | Technician handles the work |
| Technical knowledge | Basic understanding required | Experienced technician |
| Complex disassembly | Can be difficult | More suitable |
| Hardware inspection | Limited by experience | More comprehensive |
When DIY Cleaning Is Suitable
Cleaning at home may be appropriate when:
- The laptop has an easily removable bottom cover.
- The manufacturer permits user maintenance.
- Dust accumulation is relatively light.
- You have suitable tools.
- You understand basic electronic safety precautions.
When Professional Cleaning Is Better
Professional servicing is recommended when:
- The laptop has a complicated internal structure.
- The fan is difficult to access.
- The battery is swollen or damaged.
- The fan makes unusual mechanical noises.
- The computer continues to overheat after cleaning.
- The heatsink needs to be removed.
- You are unfamiliar with internal laptop components.
A qualified technician can inspect the fan, heatsink, thermal interface, and other cooling components.
Frequently Asked Questions (FAQ)
1. Can I clean my laptop fan without opening the laptop?
Yes. You can remove some loose dust through the external ventilation openings using short bursts of compressed air. However, external cleaning may not remove dust trapped around the fan blades or heatsink. Internal cleaning is generally more effective when significant dust accumulation is present.
2. Is compressed air safe for cleaning a laptop fan?
Compressed air can be used safely when handled correctly. Keep the can upright, follow the manufacturer’s instructions, and apply short bursts. When the fan is accessible, prevent its blades from spinning freely during cleaning.
3. Can I use a vacuum cleaner to clean my laptop fan?
Using an ordinary household vacuum cleaner directly on exposed internal components is not recommended because of potential electrostatic discharge and excessive suction. Use an appropriate electronics air duster or anti-static cleaning brush instead.
4. How often should I clean my laptop fan?
For most everyday users, inspecting the cooling system every six months is a reasonable starting point. Computers used in dusty environments or around pets may require more frequent inspection.
5. Why is my laptop fan still noisy after cleaning?
Persistent noise may indicate damaged bearings, a faulty motor, loose mounting screws, or another mechanical problem. High CPU usage and elevated temperatures can also cause the fan to operate at higher speeds.
6. Can dust cause a laptop to overheat?
Yes. Dust can block ventilation openings and heatsink fins, reducing airflow through the cooling system. This can increase internal temperatures and cause thermal throttling or unexpected shutdowns.
7. Should I remove the laptop fan before cleaning it?
Not necessarily. In many laptops, the fan can be cleaned without removing it. Removing the component may require disconnecting delicate cables or disturbing other parts. Follow the manufacturer’s service instructions before attempting removal.
8. Can I use a toothbrush to clean a laptop fan?
A clean, very soft brush may help remove loose dust, but an ordinary toothbrush is not ideal for sensitive electronic components. An anti-static electronics brush is a safer choice because it is designed for this type of maintenance.
9. Does cleaning a laptop fan improve performance?
It can improve performance when dust accumulation is causing overheating and thermal throttling. Removing dust helps restore airflow and allows the cooling system to manage heat more effectively. However, cleaning will not necessarily improve performance if the cause is unrelated to cooling.
10. Can I use water to clean a laptop fan?
No. Never spray or pour water into the cooling system. Moisture can damage electronic components through corrosion or short circuits. Use dry cleaning methods for removing dust.
11. What should I do if my laptop fan stops working after cleaning?
Shut down the computer immediately and disconnect the power supply. Check whether the fan cable and connector are correctly connected, provided you can do so safely. If the problem persists, seek professional assistance to inspect the fan and its control circuit.
12. Does a cooling pad eliminate the need for internal cleaning?
No. A cooling pad may improve external airflow, but it cannot remove dust accumulated inside the cooling assembly. Periodic inspection and cleaning are still necessary.
Conclusion
Maintaining a clean cooling system is essential for keeping a laptop operating reliably. Dust accumulation around the fan blades, heatsink fins, and ventilation openings can restrict airflow, increase operating temperatures, and contribute to unnecessary fan noise.
Learning how to clean laptop fan correctly allows users to remove accumulated dust and maintain better airflow. The process involves shutting down the computer, disconnecting the power supply and internal battery, accessing the cooling system when appropriate, and carefully removing dust with compressed air and an anti-static brush.
It is equally important to avoid common mistakes, such as using household vacuum cleaners, allowing fan blades to spin freely, spraying liquid cleaners, or applying excessive pressure to delicate components.
Regular inspection, proper ventilation, and a clean working environment can help reduce dust accumulation. If the fan remains noisy, stops working, or fails to control temperatures after cleaning, professional inspection may be necessary.
By following the correct cleaning procedures and maintenance practices, users can help extend the useful life of their computers and maintain a more reliable computing experience.